14: Interface and application
assignment individual assignment: write an application that interfaces a user with an input &/or output device that you made
What I could do
Set up: Touchdesigner to Arduino
Touchdesigner supports Arduino via Serial DAT. Here is a UserGuide from Derivative on how to connect them. Video on connecting ultrasonic sensor inputs to Touchdesigner.
To set up a test project I send the values 30 and 60 thought the serial port, using this code:
void setup() {
Serial.begin(9600);
}

void loop() {
Serial.println(30);
delay(1000);
Serial.println(60);
delay(1000);
}
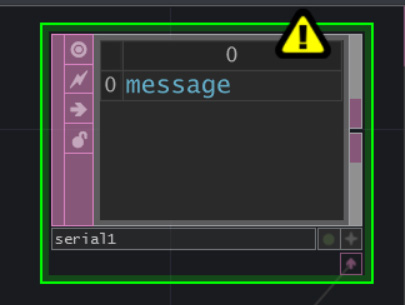
Make sure to close Arduino before activating the serial_DAT. If not Touchdesigner cannot access the serial.
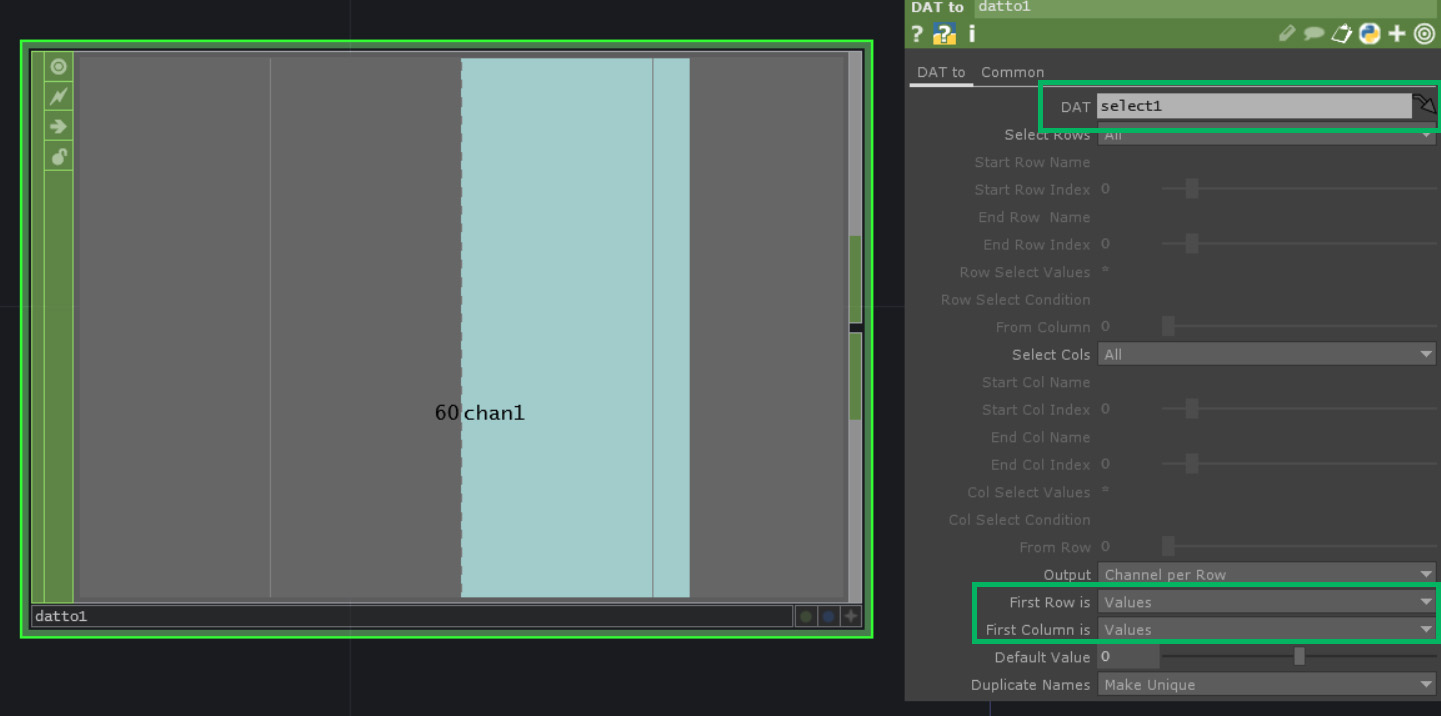
Connect to the right port in the panel on the right side of the screen. Move the slider to the same baud rate as expressed in the Arduino code. In the image below its clear that the values are being recieved by TouchDesigner.
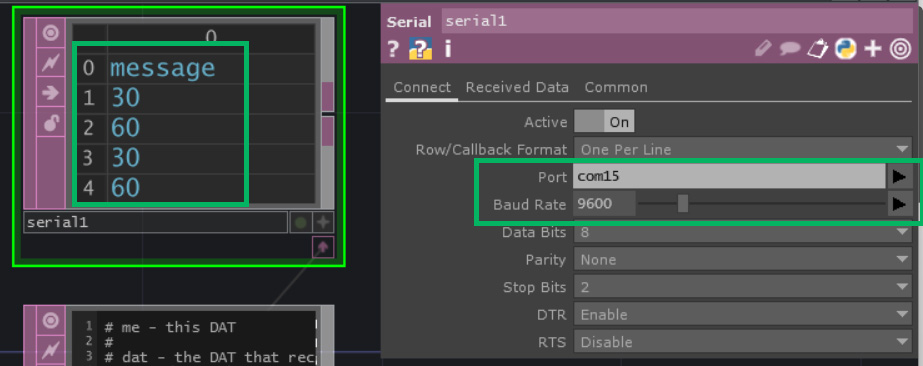
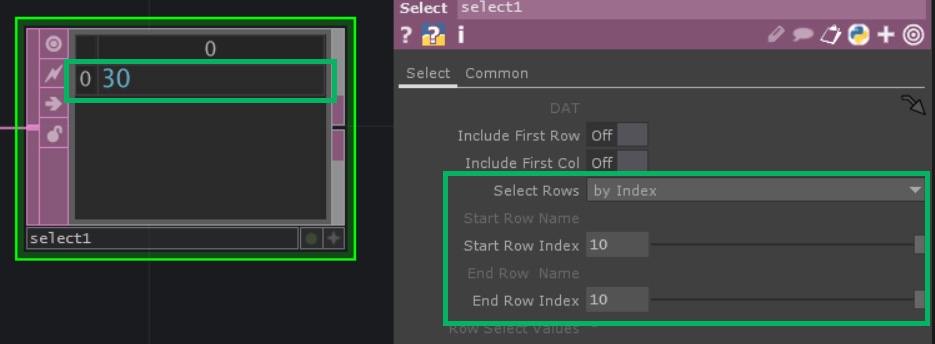
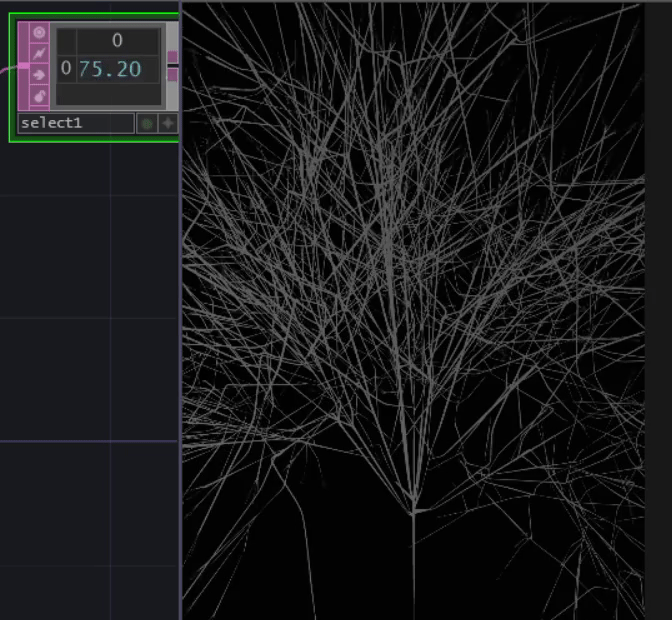
Now there are a lot of values coming in. To be able to pick 1 I added a select node. Changed the select Rows to by Index, and Start Row Index and End Row Index to 10. This allows me to display only the most recently received value.
In order to use this value I change it into a Chop - a channel operator. I made sure the DAT selected at the top of the panel has the same name as the Data node I want to convert to a chop. Then change First Row is and First Colum is to Values.
Then I add a NULL. It is concidered good practice to add a null at the end of each string. This makes it easy to make changes to that string.
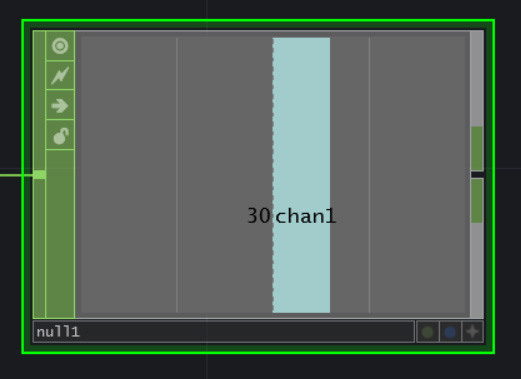
The value in the null can be linked to different nodes. Used to change size and behavior of other parts.
Touchdesigner: Individual assignment
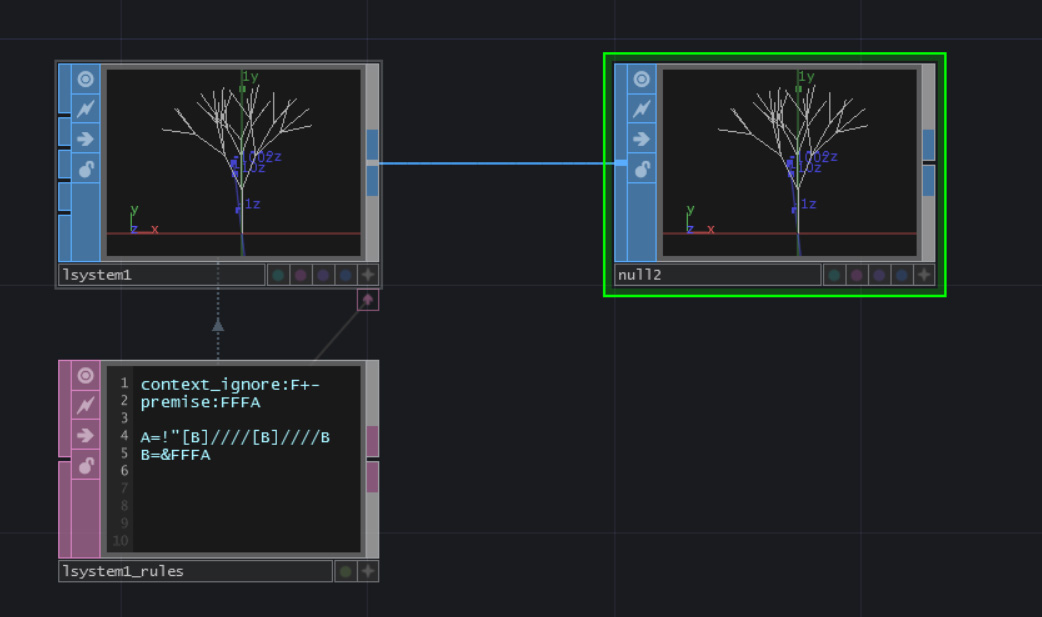
I came across this video with an introduction to L-systems in Touchdesigner. L-system or Lindenmayer system is a mathframework for modeling the growth patterns for modeling the growth patterns of plants and fractal structures.
First I add a L-system Surface operator also called a SOP. These are operators used to generate import and modify 3D structures. I connect this to NULL.
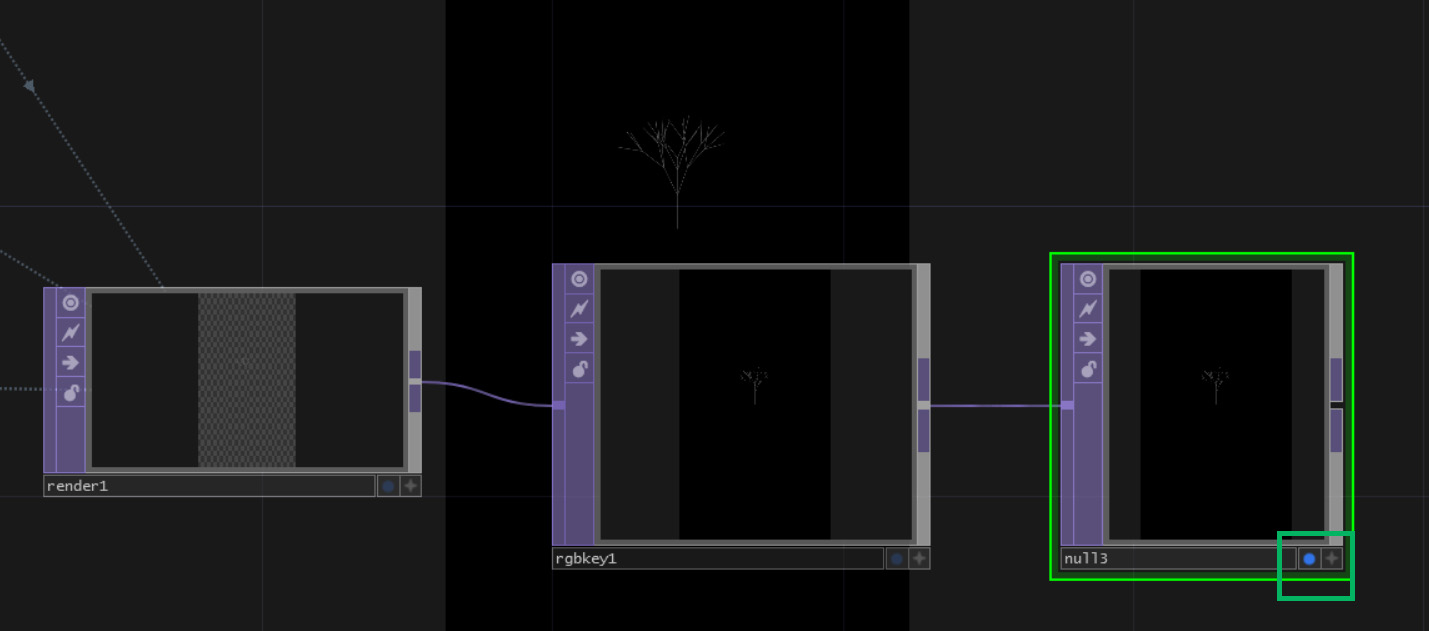
I then connect a Geometry node to the null. This can be found in the most left section of the menu. And add a camera and light node from the same section. Make sure they are not connected with each other. To transform this into a texture operator or TOP add a render top next to the other nodes. The tree from the null should now be displayed in the purple container. This didn't work at first for me, but that was because I had the camera connected tot the geometry. Change the resolution in the render to 1080 x 1920.
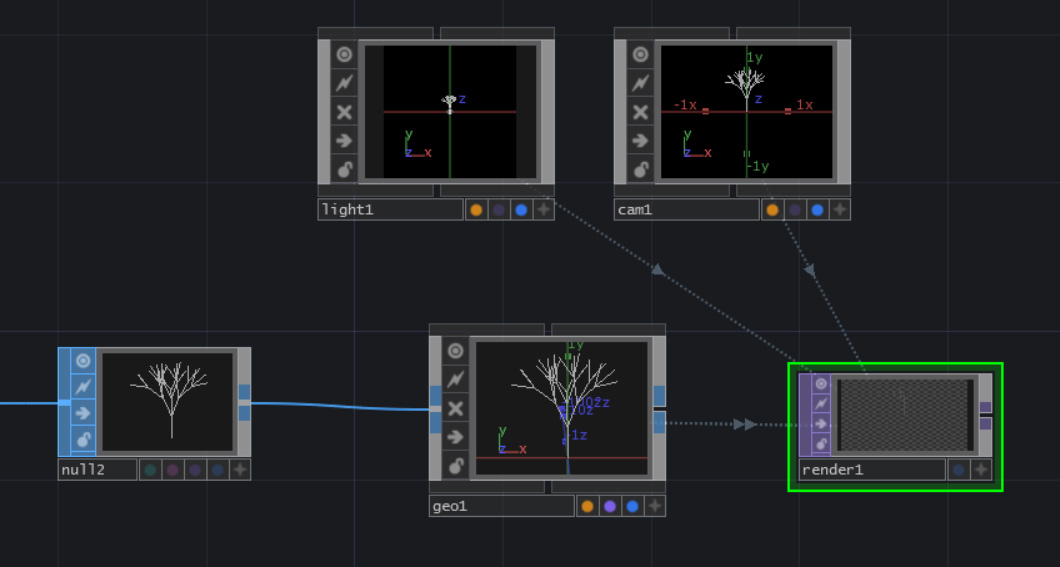
Add a RGBkey top and then a NULL. And turn on the display. This is done by clicking the blue button.
I now play around with the L-system settings.
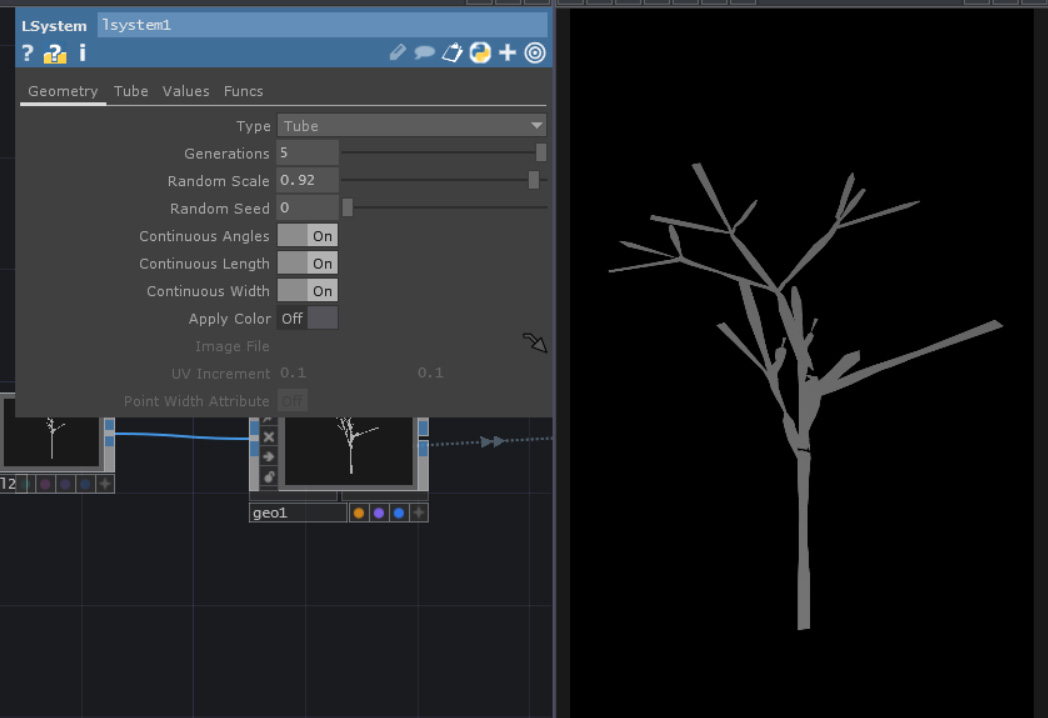
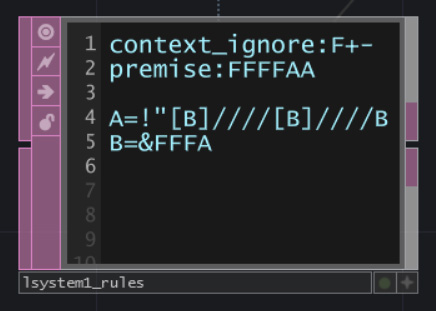
The amount of branches can be changed in the data node under the L-system. The Fs are for each starting section. The As indicate that the next part branches of/splits. In teh lowe section the B and // indicates the branches and the amount of sections on each branch.
I think it would be nice to connect the humidity form one of by boards to how many generations the tree has grown.
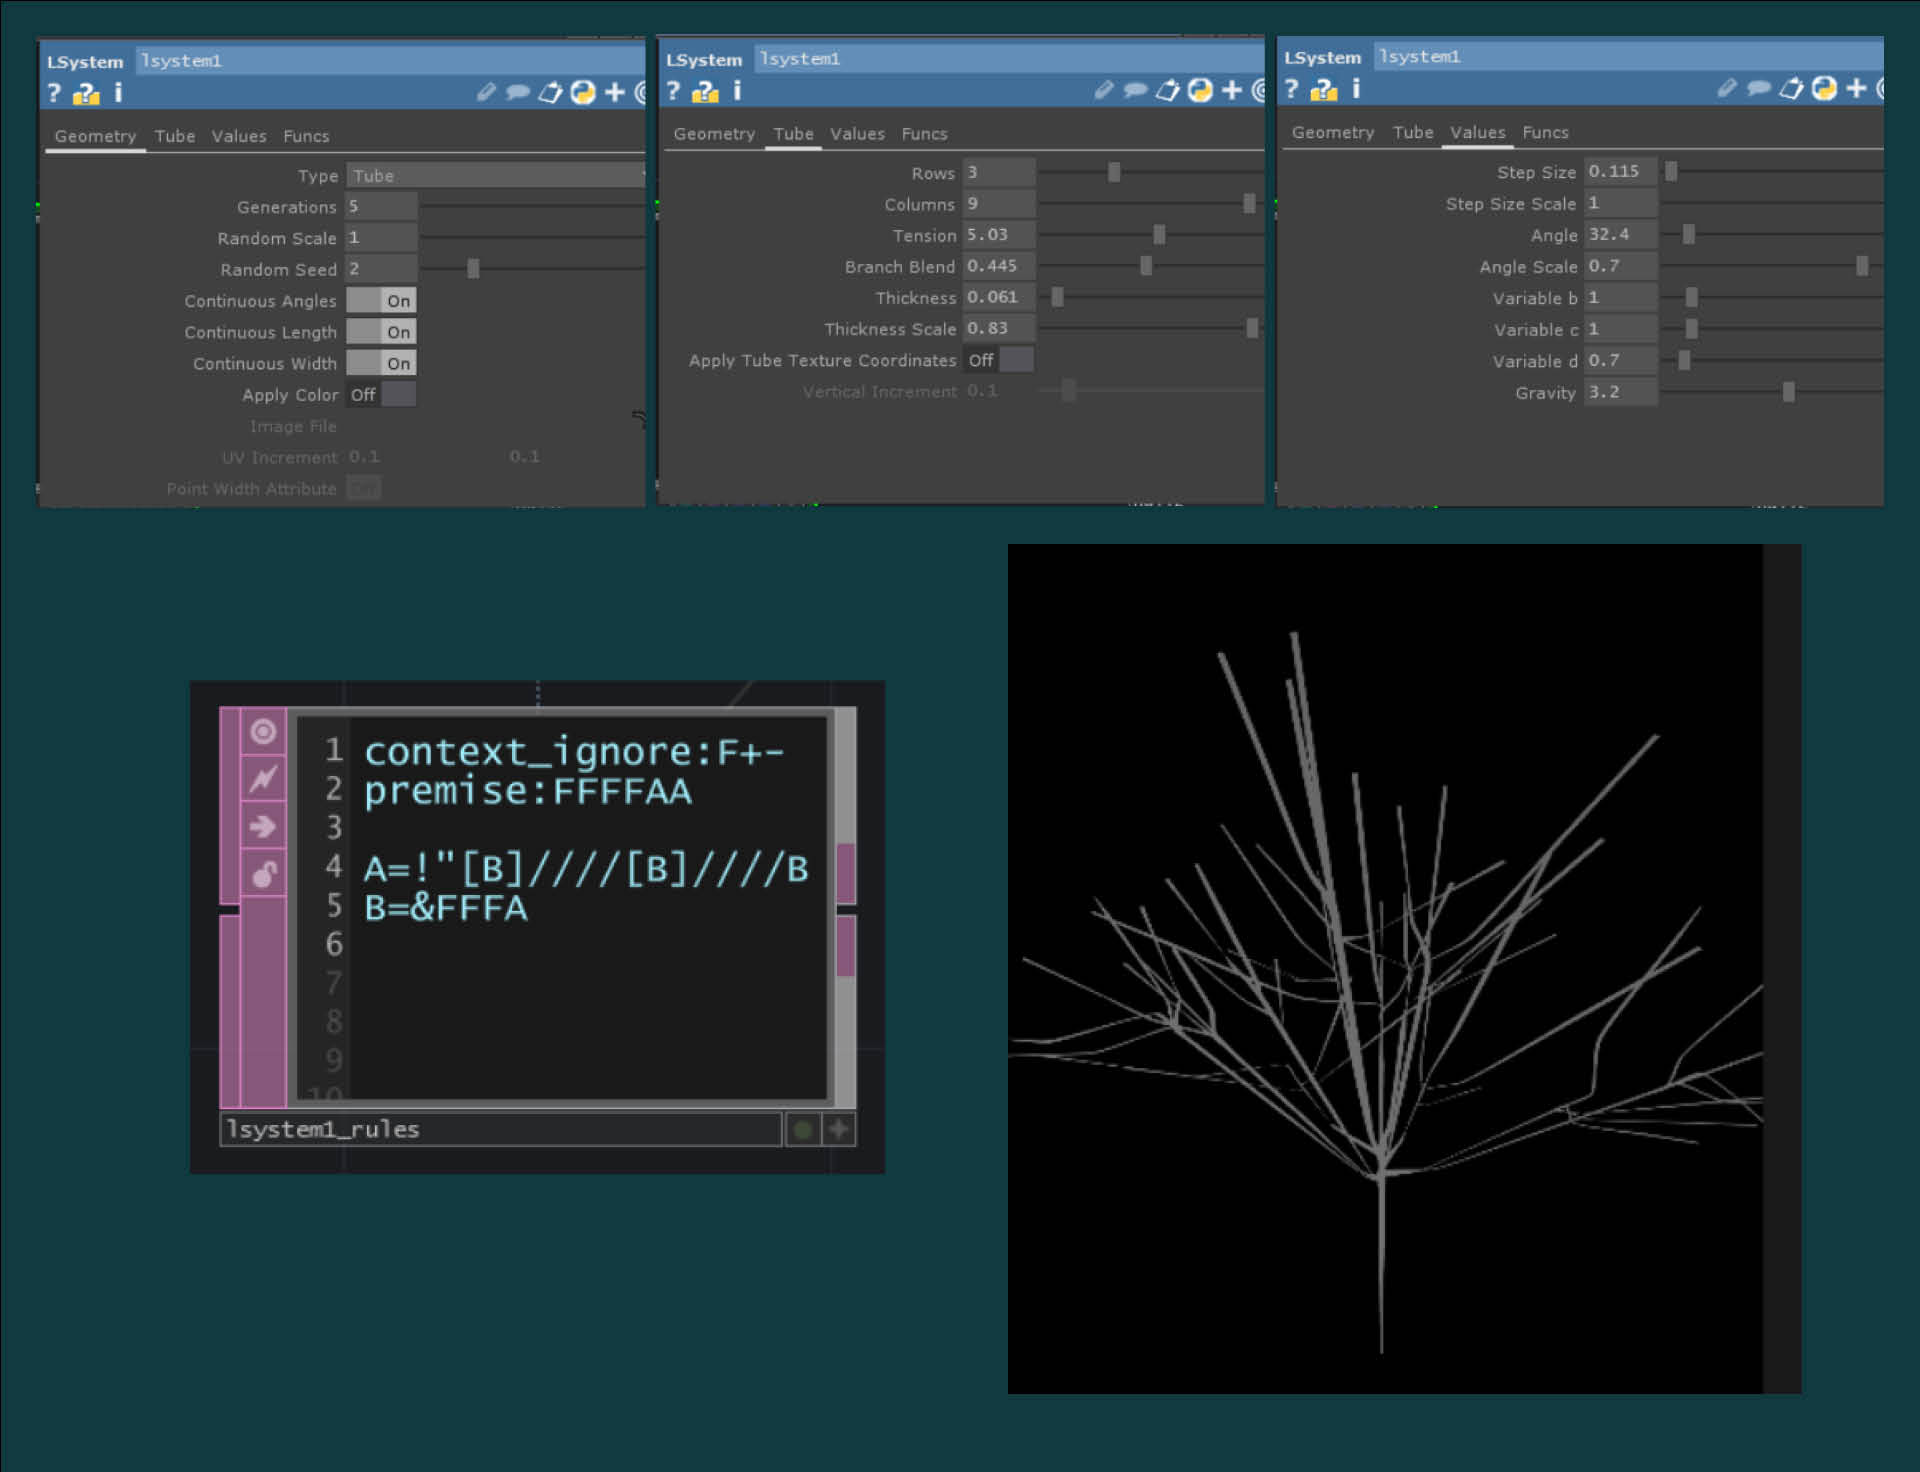
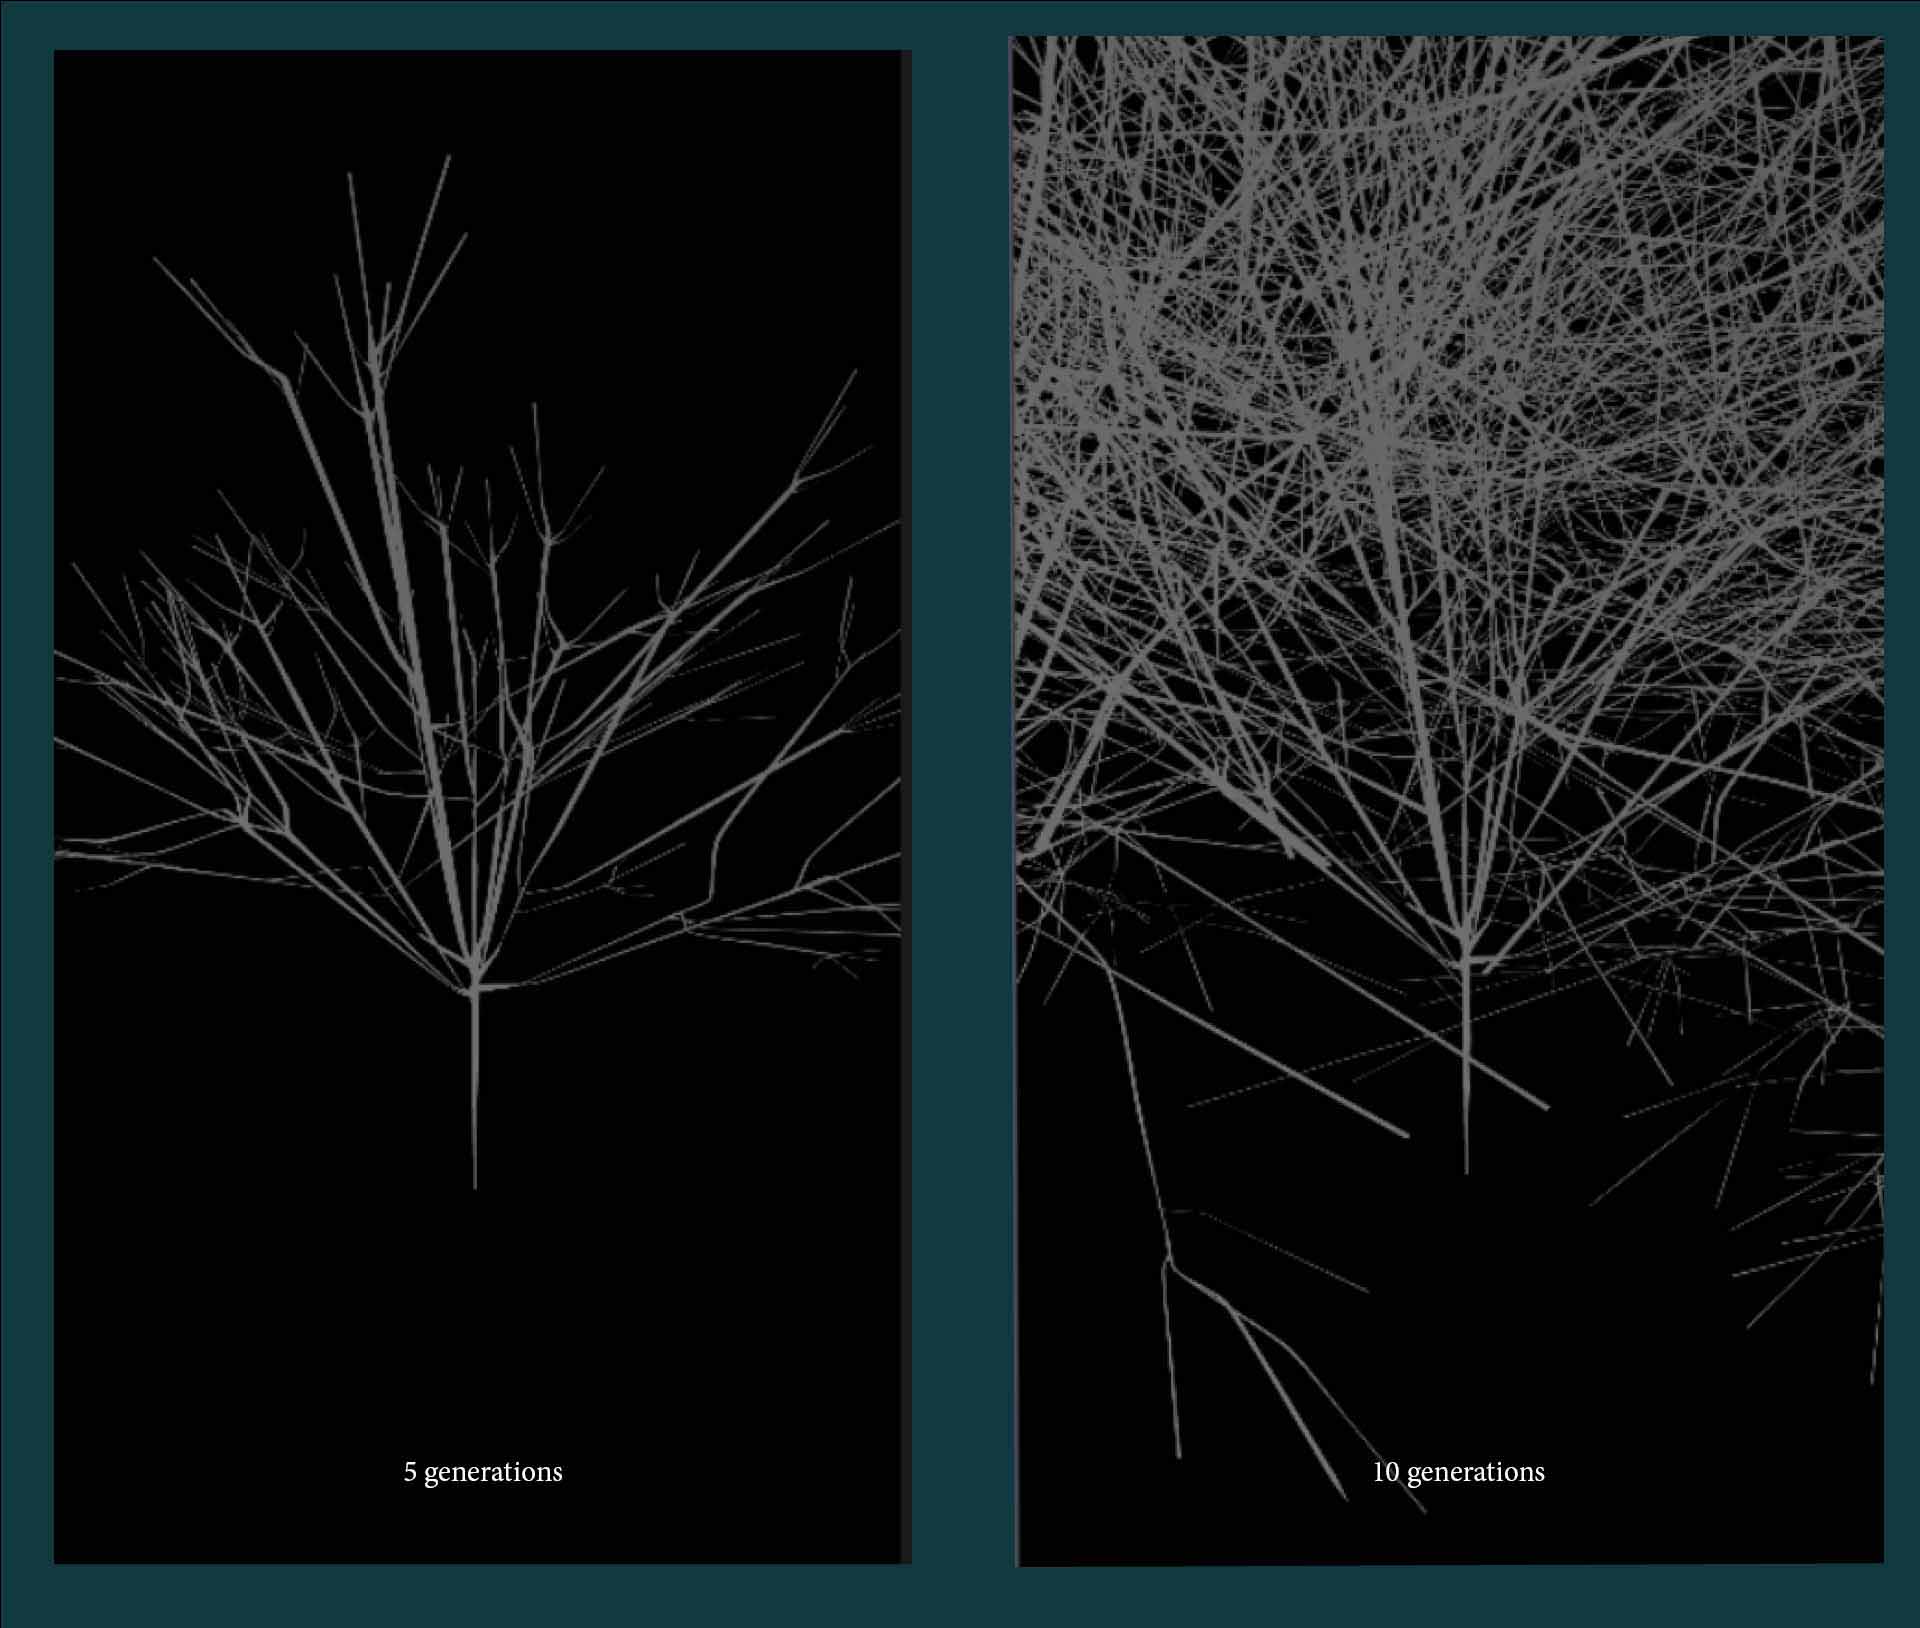
In the l-system panels there is a value called generations. For each whole number it increases the tree evolves 1 generation. Here is the difference between a well evolved 5 generation tree and a chaotic 10 generation tree. I am concidering if mapping the humitidy sensor to these values would give a fun indication of wether it is too humis of not humid enough.
I'm quite happy with this tree.
I now use the setup from the first section and use math to limit the range of numbers coming from the humidity sensor from 0 to 100 to 0 to 10. And attach this value to the generations value in lsystems.
Set up: P5.js
Connecting p5 & Arduino through the serial port video by Quarduino.
Notes from Bas
On Bas Fabacademy page there are nice resourses for learning P5.js.
group assignment: compare as many tool options as possible
When using the browser as a web server this only works in Chrome and Barve.
Javascript works in all browsers.
Visual coding
Processing great for graphics. Runs as an application.
P5.js
P5.js is a library lets you get graphics on screen fast. Runs in browser. Has an editor. Here is the editor.
Draw function runs 60 times a second.
Writing for web You have to deal witht he HTML and CSS aswell.
Visual Studo Code Has a P5.js extention.
Animations are essentially images in quick progression.
Resourses:
- P5.js References
- P5.js Tutorials
- The nature of code by Daniel Shiffman
- The coding train by Daniel Shiffman
WebSerial in P5.js
Always make a button or any other user interaction to initialise serial communication.
Test setup for this:
Add to HTML file along with the other libraries
<script src="https://unpkg.com/@gohai/p5.webserial@^1/libraries/p5.webserial.js"></script>
Main code:
let port;
const BAUDRATE = 9600;

function setup() {
createCanvas(400, 400);
port = createSerial();

// fetch the list of serial ports that were previously approved
let usedPorts = usedSerialPorts();
if (usedPorts.length > 0) {
    port.open(usedPorts[0], BAUDRATE);
}
else { // if no ports have been approved yet
    // add a button to open the serial port
    let button = createButton('open serial port');
    button.mousePressed(() => {
    // open the port
    port.open(BAUDRATE); // this will show a popup window asking the user to select a serial port
    });
    }
}
Processing
Info for how Serial library works in Processing
How to find serial ports:
import processing.serial.*;

Serial myPort;

printArray(Serial.list());
My result:

As I can see there I am connected to COM9 which is [4].
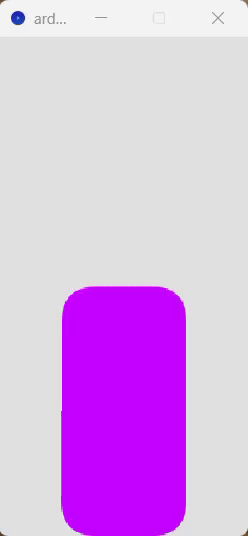
I got the random values from my board sent through the serial port to Processing using the serial port by using this code:
import processing.serial.*;

Serial mySerial; // creates local serial object from serial library

String myString = null; // a variable to connect serial data
int nl = 10; // ASCII code for carage return in serial
float myVal; // float for storing converted ASCII serial data

void setup(){
size(200,400);

// link processing to serial port (correct one)
String myPort = Serial.list()[4];
mySerial = new Serial(this, myPort, 9600);
}

void draw() {
while(mySerial.available() > 0){
    myString = mySerial.readStringUntil(nl); // STRIPs data of serial port

    if (myString != null){
    background(0);
    myVal = float(myString);// takes data from serial and turns it onto number

    myVal = myVal/100 * height;

    rectMode(CENTER);
    rect(width/2,height-(myVal/2), 100, myVal);
    } //data was on the serial port

}//do something if there is data on the port
}
Coresponding Arduino code:
#include <Adafruit_BME280.h>
Adafruit_BME280 bme; // I2C

void setup() {
// initialised the serial port for data upload
Serial.begin(9600);

unsigned status;
status = bme.begin(0x77);

delay(1000);
}

void loop() {

Serial.println(bme.readHumidity());

delay(100);
}
Result: